top of page
TECHNICAL VFX ARTIST & DIGITAL ILLUSTRATOR
PROJECT:
CYBERPUNK


CONTEXT:
A single-player first-person shooter taking place in a dystopian high-tech future.
WHAT I HAVE CREATED:
After having played a lot of Cyberpunk: 2077 in recent times, I got inspired by the game's art style and tone to create a gameplay-oriented, glitching post-process shader for a hypothetical game similar to Cyberpunk: 2077 as my first portfolio project. The purpose of this project was to study the style of Cyberpunk: 2077 and try to replicate it while also delving deeper into material behaviour at runtime via BluePrints.
HOW I MADE THE SHADER:
SCREEN DISTORTION:
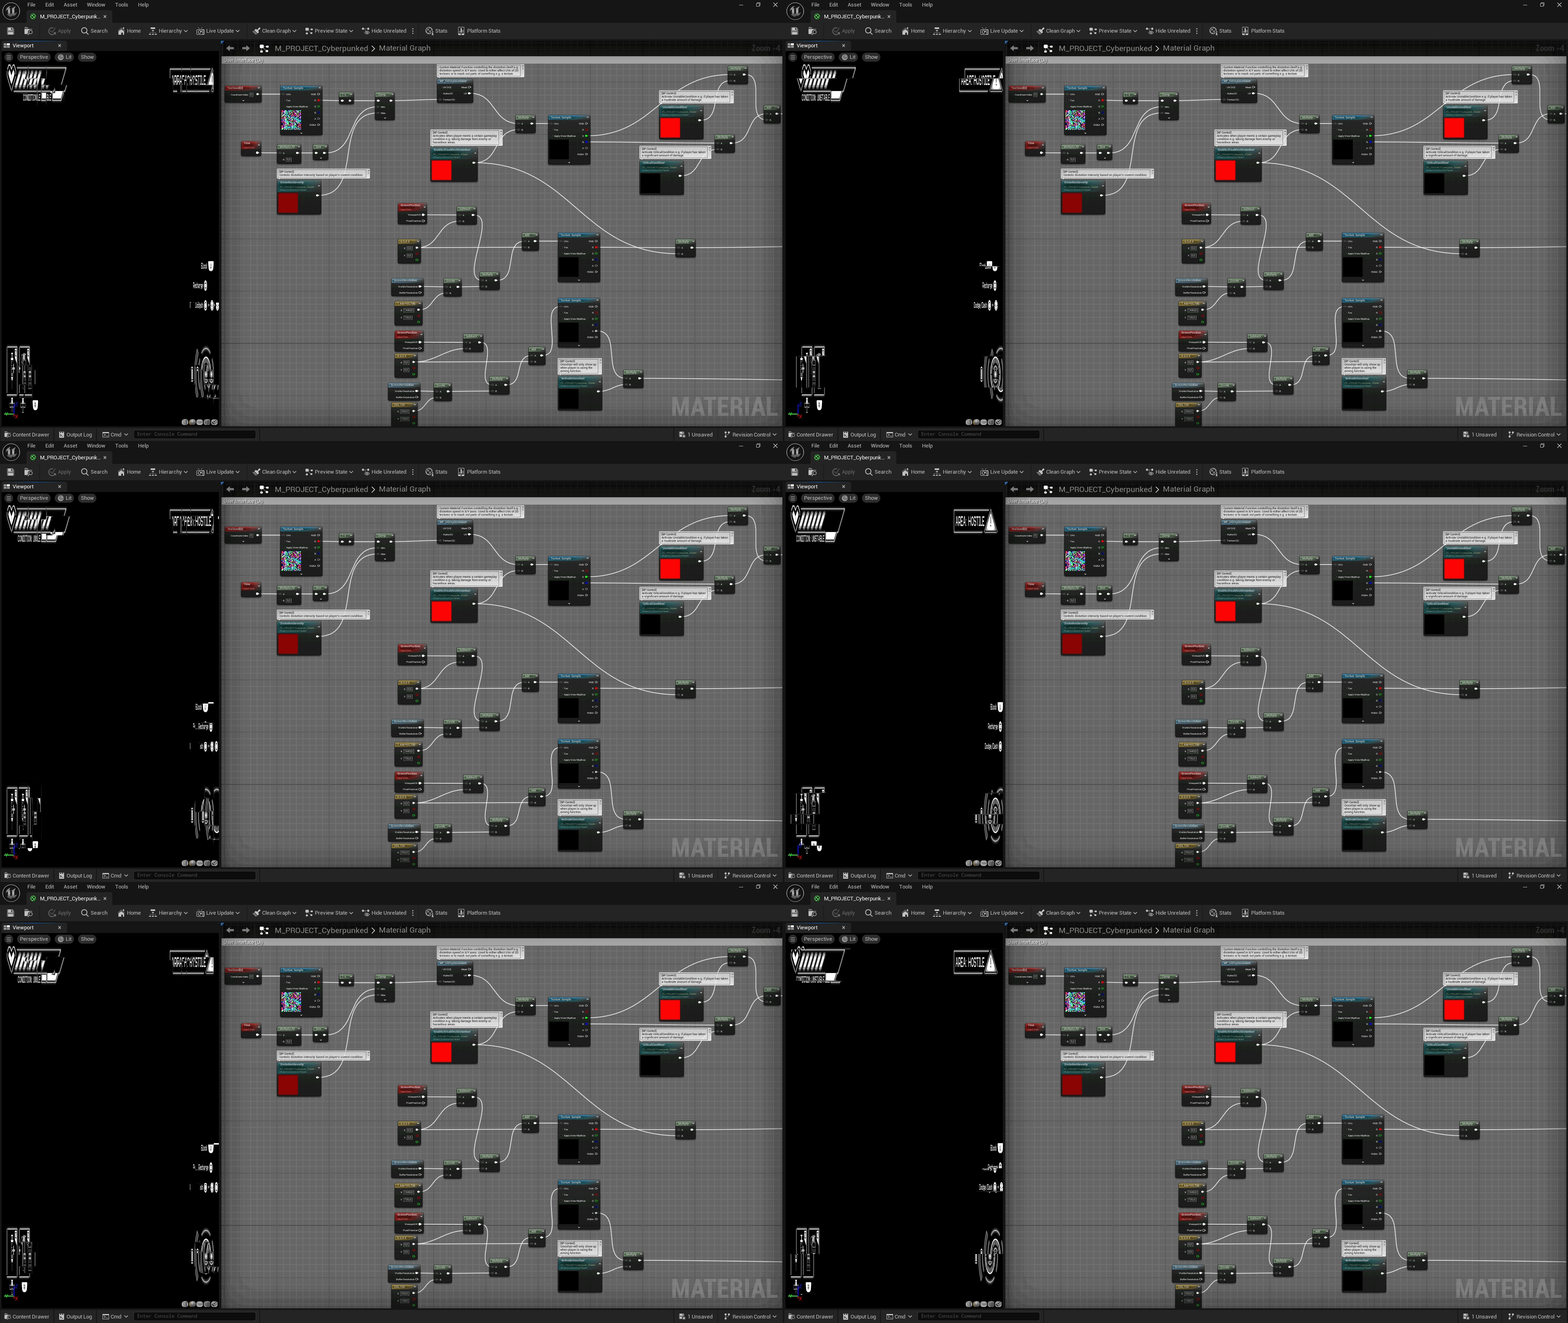
The screen distortion is split up into two different parts. The first part, being the moving blocks of squares overlaying the screen, was accomplished by multiplying Time with a Vector 2 to make them move both sideways and subtly upwards. This is then supplemented with a texture coordinate that has its X value set to 0.05 to stretch the length, while Y remains unchanged. All of this is then plugged into the UVs of a texture to give a look of pixels moving across the screen.

The second part is faking camera displacement in the shader. To accomplish this, I repurposed the same texture for the moving blocks, but I instead set the values on U and V (X and Y in this case) to 0 on both in the Texture Coordinate, which is then added with differing values in Vector 2 to give variation of the camera distortion. I multiply it all with 0.05 to slightly increase the intensity of the distortion. This camera displacement is then multiplied with the screen distortion to get the "glitching" effect.

VISIBILITY MASKING:
Another function that I added to the shader was visibility masking as a toggle for how much or how little the distortion should obscure the player's vision. I felt that it would be very difficult in gameplay to distort the entirety of the screen unless the player is in a very specific scenario e.g. finding themselves in a situation with only 1 HP left and/or entering extremely dangerous zones. The toggle is controllable via BluePrint, allowing the player to give themselves an area of clear vision via one click.
As for creating the mask itself, I multiplied a 1-to-1 Texture Coordinate with One-Minus to get "rounded" corners, which are then split into two different masks to cover the edges of the X and the Y axes. Multiply these together with a value of 400 — in BluePrint this is turned into a slider of 0 - 1, (e.g., 0 = 0, 0.5 = 200, and 1 = 400) — and we get a circular shape where the center is all white and the rounded, soft silhouette around it is black. I then saturated it all to remove unwanted grain and artifacts and then plugged it into One-Minus to invert the colors, so the center is black and the outside is white due to how alpha works (black = fully transparent, white = fully opaque).

CHROMATIC ABERRATION:
The chromatic aberration is animated via Time, plugged into sine waves with differing input values added together to create a variation in timing of it fading in and out. This is then plugged into the main chromatic aberration UV input to drive the animation.
As for the effect itself, it's made by splitting the RGB channels into separate channels, offsetting the UVs individually, and then combining them all together with a float3. The result of this is then linear interpolated with the screen distortion to blend the colors together, followed by adding an additional Time node clamped with a negative value of -2 to darken the colors, which adds even more randomness to the timed fade ins and outs.


CONDITION HANDLING:
Switching between the separate states is all handled by using multiple Linear Interpolates with float values, which are all controlled by a singular button press through BluePrint. The "Unstable" state is created by lerping the upper SceneTexture input with a secondary lerp that is lerping the upper input again. This creates a "layer" that nullifies a majority of the distortion coming from the first SceneTexture input, with distorted UVs coming from the glitch effect. This way it's blending between the same nodes stacking on top of another, creating the effect of the outer surfaces being moderately distorted but leaving the "core" intact.

THE DISTORTION & CREATION OF THE UI:
To distort the UI itself, I re-used the same RGB noise texture from the fullscreen distortion and plugged its R-channel into a One-Minus to invert the channels. I clamp this with a Time, multiplied with a Sine, to animate it fading in and out, creating a periodical stop in the glitch effect. I also created two Material Functions, one being a customized panner similar to Unreal's built-in node, and the other — in which the former is placed inside of — being a Displacement Function consisting of a set-up of two linear gradients overlapping each other, both moving upwards at different speeds in UV space using the panner function I made. These are then multiplied with the periodically blinking texture input to blend them together with the gradients, and then added with a Texture Coordinate with its R and G channel split separately to affect each channel individually. The appended result is then lerped with the non-split Texture Coordinate with alpha set to -0.1, giving off the illusion of the UI glitching sideway.
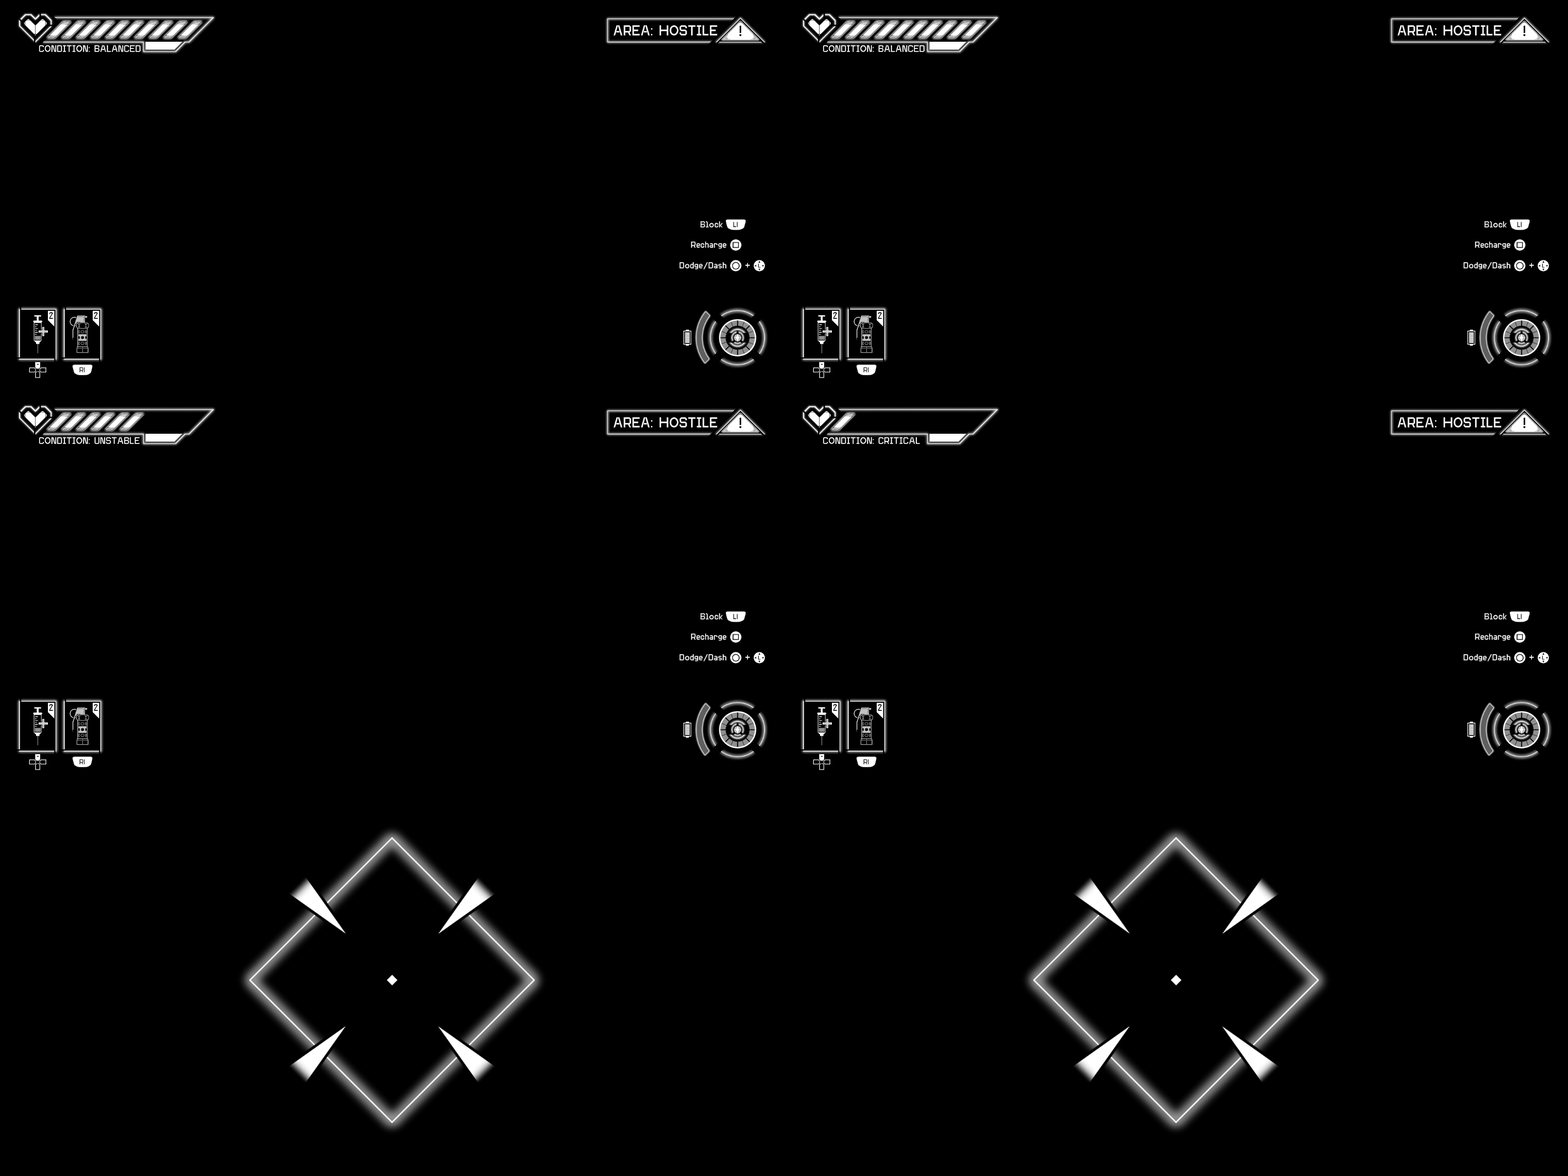
In order to display the different stats, I packed these textures into each color channel in Photoshop, including the crosshair, in a single texture file to save on texture memory rather than making four separate texture files. Each of these channels are then linked to the corresponding collection parameter that is then activated via BluePrint (e.g., Critical status text being linked to the CriticalCondition parameter or Unstable status text being linked to UnstableCondition parameter). By doing so, if the CriticalCondition state of the shader is activated, the text "Critical" will be displayed as well as the health bar being nearly completely depleted while the screen and UI is being severely distorted. Likewise, UnstableCondition will display moderate amount of screen and UI distortion with the "Unstable" text displaying and the health bar being halfway depleted. Balanced condition is set to be displayed as default, having no distortion to the screen or UI. The health bar in the balanced condition will display as full and will only switch states if either the critical or unstable condition is active.


SETTING UP AIM DOWN SIGHTS:
To set up the ADS logic and display the crosshair, I simply set up a BluePrint in which pressing the right mouse button calls on the parameter collection inside the post-process shader to rapidly set the player's movement from 600 to 300, while concurrently animating a smooth transition of the FOV from 90 degrees to 75 degrees. When released the animation plays in reverse and resets the FOV and movement speed back to default.


WHAT COULD HAVE BEEN IMPROVED UPON AND IF I HAD MORE TIME:
PERFORMANCE:
• Reduce the number of lerps and texture sample nodes used in the material as too many of them can quickly tank performance.
• Split the material into two, rather than having both the UI and the glitch shader in the exact same material, both to reduce size and to make it easier for myself and potentially others to work and navigate through with said material.
• Separate the UI components, as having them all in one file prevents one from properly animating the UI and registering individual inputs on buttons. It would also be beneficial to set up a separate Widget BluePrint for said UI rather than putting it all in the player BluePrint itself.
WITH MORE TIME ON MY HANDS:
• I would have loved to implement a functioning BluePrint system that is compatible with and recognizes inputs from a PlayStation 5 controller, since I drew UI icons specifically for the PS5 controller.
• Animate the UI and add 2D effects driven by BluePrints to the health and tech-weapon bar to emphasize the impact of getting afflicted by one state from another.
• Adding enemy and/or hazardous areas BluePrints to the environment that triggers the status effects of the player if they get hit or enter an area they should not be in rather than triggering them all by button presses on a keyboard.
• Add subtle head-bobbing to the player BluePrint when running to make it feel more lively and adding additional effects and animations while aiming.
ACKNOWLEDGEMENTS:
All textures and shaders have been created by me using Photoshop and Unreal Engine 5. Environment used for the showcase of this project was created by Axel SUZANNE.
Links to their portfolio and YouTube channel:
https://morriganvh.artstation.com/
https://www.youtube.com/watch?v=VSm6b1WJ2nw
bottom of page